External Target Lists
Introduction
In Actito, a Targeting is what we call a selection of profiles. It can be calculated thanks to criteria based on all the data in your license, or simply by a list of IDs provided in a file.
When creating a mass campaign, the target file can be provided through an API call. However, it cannot be used to update the target of continuous processes, as this call is not compatible with active campaigns.
If you want to periodically trigger scenarios or campaigns with a target that changes every day, and you want to automate this update, the solution is to use an external target list.
Let's consider a practical case
-
You are using an external tool to compute profile lists for promotional communication or segmentation, based on data that are not stored in Actito (such as 'cold' or 'operational' data).
-
These lists are exported on a FTPS to securely transfer them to Actito.
-
Every day, you want to trigger a scenario to send an e-mail to the profiles selected by your external tool.
How do external target lists work?
External target lists are based on files generated by your external tool (or partner, or team of data analyst,...) that are dropped on a file transfer location (FTPS or SFTP) and automatically retrieved by Actito as soon as they are detected.
The retrieved file becomes available as an external target list incorporated in your targeting criteria that can be used to trigger scenarios and any type of campaign, to to calculate segmentations.
A validity period can be defined to make sure the last retrieved file can only trigger marketing actions for a set amount of time and to make sure that profiles cannot be targeted several days in a row should you encounter issues with your external tool.
Setting up an external target list
Step by step
-
Define the file transfer location
- 1.a List the file transfer locations of your license
- (1.b Create a new file transfer location)
-
Set up a file synchronization
-
Set up an external target list
Step 1. Define the file transfer location
Step 1.a List the file transfer locations of your license
File transfer configurations are FTP(S) or SFTP servers used to transfer the data between your external tool and Actito so it can be used in external target lists.
The server can be:
- Provided by Actito: in this case, it will always use the FTPS protocol
- Your own server: the supported protocols are FTP(S) and SFTP
Unsecured FTP are supported if you provide your own server, but not recommended.
If you use the FTPS provided by Actito, it will be set up in your license by the Actito team.
You can retrieve its id with the call :
GET /file-transfers/v5/entities/MyEntity/filetransfer-configs
This gives you the list of file transfer configurations in your license.
Note the id of the Actito FTPS.
{
    "_embedded": {
        "configurations": [
            {
                "id": "123456",
                "name": "An_Actito_FTP",
                "displayName": "Actito FTP",
                "connection": {
                    "serverType": "FTP",
                    "parameters": {
                        "host": "ftp.actito.com",
                        "port": 21,
                        "passiveMode": true,
                        "encryption": "EXPLICIT_OVER_TLS"
                    },
                    "authentication": {
                        "type": "LOGINPASSWORD",
                        "login": "actito"
                    }
                },
                "_links": {
                    "self": {
                        "href": "/file-transfers/v5/entities/MyEntity/filetransfer-configs/123456"
                    }
                },
                "_audit": {
                    "createdAt": "2018-12-02T17:38:41.783Z",
                    "updatedAt": "2019-01-07T16:00:43.560Z"
                }
            }
        ]
    },
    "filter": {},
    "page": {
        "pageNumber": 0,
        "pageSize": 200,
        "totalPages": 1,
        "totalElements": 3
    },
    "_links": {
        "self": {
            "href": "/file-transfers/v5/entities/MyEntity/filetransfer-configs?page=0&pageSize=200"
        },
        "first": {
            "href": "/file-transfers/v5/entities/MyEntity/filetransfer-configs?page=0&pageSize=200"
        },
        "last": {
            "href": "/file-transfers/v5/entities/MyEntity/filetransfer-configs?page=0&pageSize=200"
        }
    }
}
To be able to drop files on the FTPS server, the IP address of your external tool must be whitelisted. Please communicate it to support or to your account manager.
A file transfer config is made of file transfer locations, which represent the directories of the FTPS.
Typically, the Actito FTPS is configured with an /IN and an /OUT directory.
Retrieve the file transfer locations with the following call and the id retrieved at the previous step :
GET /file-transfers/v5/entities/MyEntity/filetransfer-configs/123456/locations
Note the id of the /IN folder, where the file will be dropped.
{
  "_embedded": {
    "locations": [
      {
        "id": "987321",
        "name": "incoming_folder",
        "displayName": "Incoming Folder",
        "path": "/IN",
        "_audit": {
          "createdAt": "2019-10-07T02:31:20.093Z",
          "updatedAt": "2019-10-29T05:54:23.111Z"
        },
        "_links": {
          "self": {
            "href": "/v5/entities/MyEntity/filetransfer-configs/123456/locations/987321"
          }
        }
      },
      {
        "id": "987654",
        "name": "outgoing_folder",
        "displayName": "Outgoing Folder",
        "path": "/OUT",
        "_audit": {
          "createdAt": "2019-10-27T19:48:09.792Z",
          "updatedAt": "2019-10-01T02:18:26.651Z"
        },
        "_links": {
          "self": {
            "href": "/v5/entities/MyEntity/filetransfer-configs/123456/locations/987654"
          }
        }
      }
    ]
  },
  "filter": {},
  "page": {
    "pageNumber": 0,
    "pageSize": 200,
    "totalPages": 1,
    "totalElements": 3
  },
  "_links": {
    "self": {
      "href": "/v5/entities/MyEntity/filetransfer-configs/123456/locations?page=0&pageSize=200"
    },
    "first": {
      "href": "/v5/entities/MyEntity/filetransfer-configs/123456/locations?page=0&pageSize=200"
    },
    "last": {
      "href": "/v5/entities/MyEntity/filetransfer-configs/123456/locations?page=0&pageSize=200"
    }
  }
}
Step 1.b Create a new file transfer location
If you want to use your own server (regardless of the protocol), you need to set up the file transfer config.
Use the following call and follow the specs to push the correct body depending on the server type: FTP(S), SFTP with login/password or SFTP with private key authentication.
POST /file-transfers/v5/entities/MyEntity/filetransfer-configs
If you use your own file transfer server, you must provide the IP address of this server to Actito for whitelisting.
Please forward them to support or your account manager.
Here we are configuring a SFTP with a SSH private key.
{
  "name": "SFTP_3RD_PARTY",
  "displayName": "SFTP Third Party",
  "connection": {
    "serverType": "SFTP",
    "parameters": {
      "host": "sftp.thirdparty.com",
      "port": 22
    },
    "authentication": {
      "type": "PRIVATE_KEY",
      "login": "actito"
    }
  }
}
Note the id you receive as response.
For a private key SFTP, you also need to generate the key, with the following call (and the id of the config):
POST file-transfers/v5/entities/MyEntity/filetransfer-configs/456789/generate-ssh-private-key
You will obtain the public key required for the set-up of the server on your side.
After creating the file transfer configuration, you need to create the locations, which represent the directories of the (S)FTP(S), with the following call:
POST /file-transfers/v5/entities/MyEntity/filetransfer-configs/456789/locations
Here we are setting up the reference to the /IN folder:
{
  "name": "input_folder",
  "displayName": "Input folder",
  "path": "/IN"
}
Please note the id you receive as response.
Step 2. Set up a file synchronization
Once the file transfer location where your external tool will drop the file has been configured, you can set up a file synchronization.
Creating a file synchronization means defining the active polling to automatically retrieve a file when it is detected on a (S)FTP(S).
File synchronizations can be used in several Actito concepts:
- an external target list to make a selection of existing profiles for use in a targeting, like we are doing here.
- in a triggered ETL to import the content of the file in your Actito tables and create/update data.
When defining an external target list, the content of the synchronized file reference must therefore already exist in your profile table. Unknown IDs will not be imported, which means any new data must be synchronized first.
Setting up a file synchronization can be done with the call:
POST /file-transfers/v5/entities/MyEntity/file-synchronizations
- The "remoteLocationId" is the file transfer location retrieved/created at step 1, where the files corresponding to the "fileNamePattern" will be dropped.
- Various date patterns are accepted, as documented in the specs. The declared mimeType must match the file extension.
- Both TXT and CSV files can be used in external target lists (including zipped archives). Because they require only a single column of IDs, we advise to use TXT.
Some limits have been defined regarding the external target lists:
- Maximum size of the file used: 50 MB
- Maximum file synchronizations per license: 60
- Maximum file retrievals per day (shared between triggered ETLs and external target lists): 600
{
  "name": "external-target-calculation-filesync",
  "userName": "External Target Integration Flow",
  "location": {
    "type": "REMOTE",
    "remoteLocationId": "1"
  },
  "fileDescription": {
    "fileNamePattern": "external_target_$yyyyMMdd.csv",
    "mimeType": "text/csv"
  },
  "paused": false,
  "postAction": {
    "type": "DELETE"
  }
}
Please note the id you receive as response.
Step 3. Set up an external target list
One the polling has been configured with the file synchronization, you can configure the external target list proper, with the following call:
POST /external-target-lists/v5/entities/MyEntity/target-lists
- The external target list is currently always fed through a file synchronization, referenced by the "fileSynchronizationId" noted at the previous step.
- The "validityRule" allows you to define how long the last retrieved file remains valid. Once a file is expired, the targeting in which it is used will encounter an error and will not trigger any automated process.
The validity rule ensures that, should the file synchronization with your external tool fail for some reason, your campaigns or scenarios will not be triggered with the same target twice in a row.
The validity period and time should therefore be calculated to be just under the scheduled frequency and time of the marketing action triggered through the external target list.
{
  "name": "externalSegmentation",
  "displayName": "External Segmentation",
  "feeding": {
    "type": "FILE_SYNCHRONIZATION",
    "fileSynchronizationId": "12"
  },
  "validityRule": {
    "period": {
      "timeUnit": "DAY",
      "length": 1
    },
    "untilTime": "10:00"
  },
  "reportRecipients": [
    "report@actito.com"
  ]
}
Using an external target list
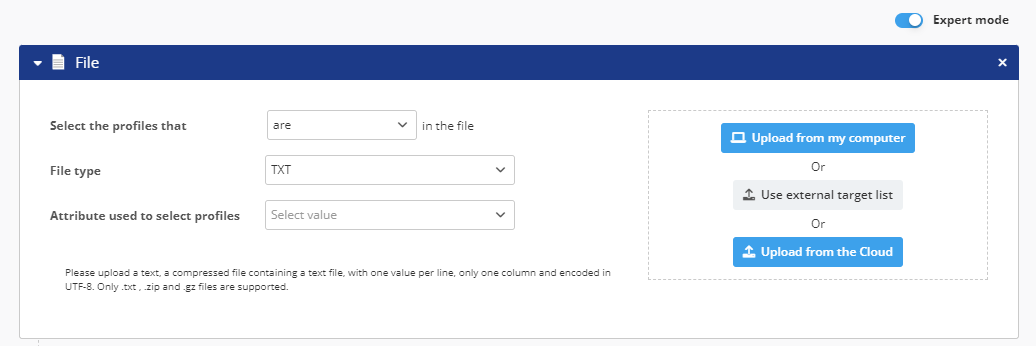
Once an external target list has been defined, users of the Actito interface are able to select it by activating the expert mode and choosing the 'File' targeting module (more details on this module here)
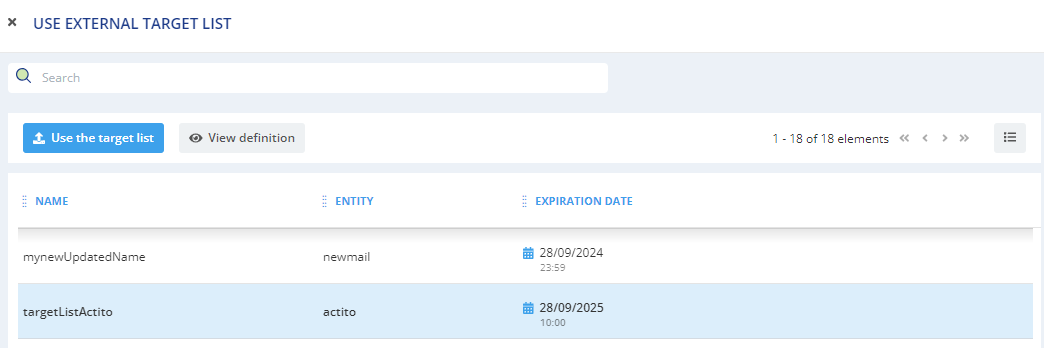
Selecting 'Use external target list' opens a modal windows where users can choose between the existing external target lists.
Under the 'Expiration date' column, they can check until when the current last retrieved file remains valid.
If using a CSV file, please inform interface users of the separator and the header name, as they must input it without autofill when they define their targeting criteria.
Targetings referring an external list can now be used to automatically update a profile selection in reusable and automated processes, such as:
- saved targetings that trigger a scenario, like in the practical case mentioned in the intro
- newsletter campaigns
- segmentation rules
- ...

